How to Get Your First Push-up (2 Simple Methods)
IN THIS POST
Follow this push-up progression plan for beginners to become a pro at the most convenient bodyweight exercise you can do to develop muscle and strength in your upper body.

Intro: Push-up progression plan
Mastering the tried and true push-up exercise is a great introduction to strength training.
How is it that some people just make them look so easy?
Here you are, struggling with all your might and strength to get just one.
ONE.
Forget about repping out 5, 10, 15 in a row!
I have some good news for you.
You’ve found the right article if your goal is to get better at push-ups.
By following the push-up progression plan I’m about to lay out for you, you’ll not only be able to achieve your very first push-up but progress to doing multiple ones in a row.
My only ask is that you complete the steps in order and don’t just skip to your lou around.
Skipping steps means less success.
(I totally made that up as I’m typing this 😂).
But for real though, if you stick to this push-up progression plan you’ll come out on the other side a lean, mean, push-up machine. 💪🏾

How to do a push-up with perfect form
Before we get into the meat and potatoes of your push-up progression plan, let’s talk about how to actually perform a push-up with proper form.
You’re probably not here yet and that’s okay.
Don’t look at this checklist of where you have to be right now.
Look at it as where you want to be at the end, when it’s all said and done.
Just file it away in your mind for now.
Push-up cues
- Brace your core: Pretend like someone’s bout to punch you in the gut and like you’re trying to squeeze a penny between your butt cheeks.
- Keep your spine neutral
- Hands shoulder-width apart or slightly outside that
- Wrists should be in line with your shoulders
Step #1
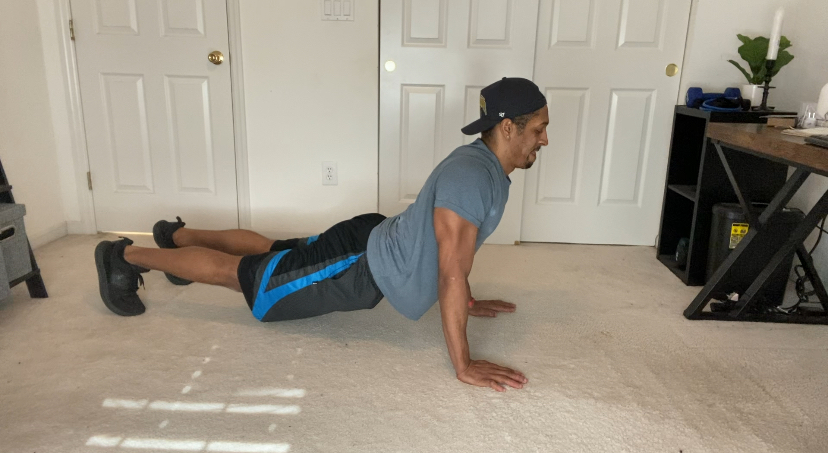
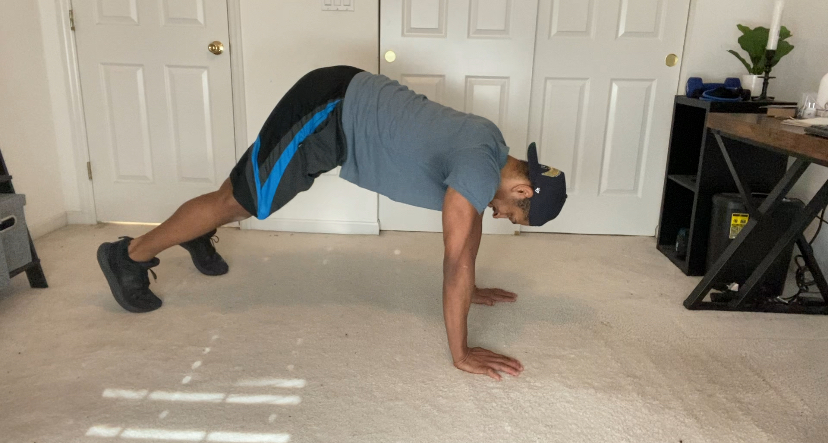
Get into a plank position. Your arms should be roughly shoulder-width apart and you should be able to draw a straight from your shoulder all the way down to your hands. Feet should be behind you and you’re up on your toes.
Step #2
Brace your core (like you’re expecting a punch to the gut) and keep your butt tight. Imagine someone’s trying to put a stick up there, which you’re obviously not down for, at least not right now).
Step #3
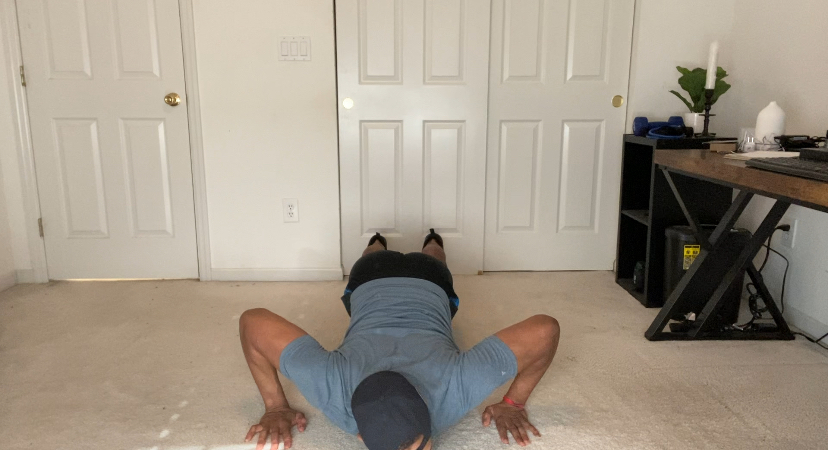
You’re going to lower yourself down nice and controlled by bending at the elbows. Make sure your elbows don’t flare out wide. Instead, you want your arm angle to be around 30-45 degrees.
Step #4
Once you reach the bottom of the movement, drive up like you’re trying to make a hole in the ground.
Related: How to get your very first chin-up.
Common mistakes to avoid while doing push-ups
1. Elbows flaring out
And it really puts a lot of stress on your shoulders when you do this.
How do you fix it?
Position your hands so that they’re directly below your shoulders (or just slightly outside shoulder-width).
From a side view, you should be able to draw a straight line from the middle of your shoulder down to the bottom of your hands.
Also, when you lower yourself down, don’t just try to drop straight down.
Your head should end up slightly forward at the bottom of your push-up
2. Dropping your hips
How do you fix it?
Make sure you’re bracing your core and keeping your butt tight throughout the movement.
Remember, pretend someone’s about to give you a punch to the abdomen.
That’s what I mean when I say “brace your core.”
And then butt tight = someone’s trying to get a little freaky and stick a finger up there but you clench your butt as a way to let them know “Hey, not today.”
Imagine you have to balance a glass of water on your lower back at the bottom of your push-up.
Arching your lower back and letting your hips sag will no doubt tip the glass over.
You want to be in as straight of a line as possible so the glass doesn’t spill.
Give this post a read: How to get and STAY motivated to achieve your fitness goals.
3. Sticking your butt in the air
- This SUCKS for your shoulders.
- You’re not getting a whole lot out of the movement.
How do you fix it?
Similar to the last one, focus on bracing your core and glutes.
4. Not performing full reps

People don’t go all the way down and back up because they haven’t built up the strength to do full range of motion (ROM) push-ups.
How do you fix it?
If that’s you, you don’t have to worry.
If you follow the steps in order of the push-up progression plan we’re about to go over you’ll be on the path to performing push-ups with correct form.
Push-up progression plan: The 2-step method
We’ve talked about how to do a push-up but now it’s time to shift the focus toward actually performing one.
There are two methods in this push-up progression.
You’ll actually be performing each method simultaneously so it’s not like you do one step, then the other.
You do one step AND the other.
The first method of your push-up progression plan is simply performing push-ups on an elevated surface.
Elevated push-ups give you some assistance as you build up the strength to do ones straight from the floor.
You might be thinking, “Well, can’t I just do push-ups on my knees if I want to make things easier?”
And to that I’ll say this…
The reason I like elevated push-ups, as opposed to knee push-ups, is because elevated ones better mimic the actual push-up position.
Your core is tight and you’re in a plank position, just elevated.
When you’re doing push-ups on your knees, you’re not in that same plank position where you really have to brace your core and squeeze your glutes.
Already having the plank position form in place translates better into you performing traditional push-ups from the floor.
Something to keep in mind about elevated push-ups…
The lower the surface, the harder the push-ups will be.
It’s okay to start slow and build your way up.
You may have to start with push-ups doing them on the wall like this, and that’s totally okay!

As you build up strength, you can progress to lower and lower surfaces until you reach the point where you’re ready to do push-ups on the ground.
No matter where you start, once you can get 3-4 sets of 8-10 reps at a specific height then you can lower the surface.
Repeat that push-up progression sequence until you’re ready for traditional push-ups from the ground.
Have you ever wondered: Should I do cardio or weights first?
Read this post to find out.
Eccentric-only push-ups
As I mentioned before, this next push-up progression method will be done in conjunction with the one I laid out above.
The eccentric phase of a push-up (or any strength training movement for that matter) is lowering yourself down to the ground.
Working exclusively on the eccentric part of your lifts places some serious tension on your muscles (one of the ways you can progressively overload), which is a good thing.
It’ll help you build up the strength to do traditional, full-range-of-motion push-ups.
Here’s how to perform an eccentric-only push-up:
- Start in the push-up position
- Slowly lower yourself down, taking about 3-5 seconds to do so
- Once you reach the bottom, go ahead and drop to the ground
- Get back up to the starting position using your hands and knees, and then repeat
Is a weekly “cheat meal” or “cheat day” ruining all your progress?
The ultimate push-up progression plan workout
Results are driven by consistency so you need to be intentional (not just go through the motions or do a few push-ups every once in a while) about putting in the work to get better at push-ups or achieve your very first one.
Running through the workout I’m about to share 2-3 times per week is ideal but if all you have is one day a week, just remember this…
Something beats nothing 100% of the time.
Take at least a day off in between doing this workout (so there should be at least 48 hours of rest between each time you perform this workout).
Just so we’re on the same page, let’s say you do this workout on Monday.
You wouldn’t do it again until Wednesday at the earliest.
Or if you did this workout on Tuesday, you’d wait until Thursday to go through it again.
Push-up progression workout:
- Elevated push-ups: 3-4 sets of 8-10 reps
- Negative push-ups: 2-3 sets of 5-6 reps each (take 3-5 seconds to lower yourself down to the ground)
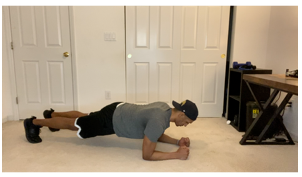
- Forearm plank: 3 sets of 30 second-1 minute hold. If this is too difficult for you, scale things back to a push-up plank. Proper form for both of these variations can be seen below.

If that’s the wall, then do that.
If it’s on a weight bench, start there.
As for eccentric-only, these don’t have to be done from a traditional push-up position.
You can do them elevated at whatever height you’re comfortable with.
You feel a little flabby in some areas you don’t want to
Which leads to the question…
Do you consider yourself advanced? Try these push-up progressions
Start with one variation and see if you can get 3-4 sets of 8-12 reps.
If that becomes too easy, try to get 12-15 reps.
And then the final boss level for an individual variation is 15-20 reps (FYI, this most likely will not be the case with 3-second negative push-ups).
Once you feel like you have a variation mastered, pick a new one, and rinse and repeat.
From left to right, top to bottom, we have:
- Decline push-ups
- Dead stop push-ups
- Lateral push-ups
- 3-second negative push-ups

Push-up progression plan FAQs
How long does it take to learn one push-up?
How long it takes you to get your very first push-up will be different than Brittany in HR or your neighbor, Kenny, down the street.
But none of that matters.
It’s you against you when it comes to your push-up progress.
Focus on getting just 1% better each time you practice your push-ups.
Can you squeeze out just one more rep than you did last time?
Can you perform your reps with better form?
That’s what matters.
What is 4-3-2-1 repetition tempo?
Tempo is basically the speed at which you’re going to perform a particular exercise.
Let’s break down what each number means:
- First number = eccentric or lowering phase → this is how many seconds you will take to lower yourself down to the ground.
- Second number = how many seconds you’re going to pause at the bottom of the movement.
- Third number = the concentric phase (I.e. how fast you’re going to “get the weight up”)
- Last number = how long you’re going to pause at the top of the movement.
Here’s how the 4-2-3-1 repetition tempo would shake out when performing a push-up:
- You take 4 seconds to lower yourself down to the ground
- You pause at the bottom for 3 seconds
- You take 2 seconds to bring yourself back up to the starting position
- Then you pause for 1 second at the top before repeating the cycle.
How do you increase push-ups progressively?
All you have to do is follow the push-up progression plan I’ve laid out for you in this article.
Remember not to skip any steps 😉

What's up?
I’m Chad, I’m happy you’re here! I’m a certified personal trainer and my goal is to help you form practical, sustainable habits that lead to lifelong fitness results. If you want to lose fat, build muscle, and live a healthier, happier life then you’re right where you need to be. 💪🏾
Free resources
⬇⬇⬇


0 Comments