IN THIS POST
Picture this:
You’re traveling and don’t have access to a gym, which places you in a pinch.
But you don’t want to fall off the fitness wagon.
So what do you do?
Just throw your hands in the air and say screw it?
Nope, not at all.
You do the exact opposite!
You make lemonade out of lemons and ask yourself instead, “How can I workout with what I have?”
And here’s how…
With just your bodyweight, some floorspace, and a little bit of creativity, you can have a challenging yet rewarding workout to stay on track with your fitness goals.
The best benefits of bodyweight exercises
Here are some of the major benefits of bodyweight exercises:
- Beginner-friendly: If you’re new to strength training, bodyweight exercises can be a great way to “dip your toe in the water.” You’ll get used to performing different movement patterns that’ll translate to lifting weights when you’re ready. For example, squatting with just your bodyweight first prepares you to perform squats with weight on the bar.
- Convenient: You don’t need any equipment so bodyweight exercises can be done essentially anywhere at any time.
- Time-efficient: There’s no setup with bodyweight exercises, which saves you time.
- Help switch up your workout routine: Adding bodyweight exercises into the mix keeps things fresh and you more engaged with your training.
- Injury prevention: Bodyweight exercises are low-impact (don’t put as much pressure on your joints), which minimizes injury risk.
- They don’t cost you any money: The only “payment” or “dues” for bodyweight exercises is effort you put toward your workouts!
- Build muscle and lose fat: We’ll talk about this in more detail in the next section but strength training is the only form of exercise that enables you to build muscle. The more muscle you have, the more fat you’ll lose and the more toned your physique will be.
Can you build muscle with bodyweight exercises?
As a complete beginner to to strength training, yes, bodyweight exercises can lead to you building muscle.
And they’re great for all the reasons you just learned about above.
Buuuut it’s worth pointing out you won’t be able to rely on bodyweight exercises alone forever to keep building muscle.
You need something called progressive overload, which is the act of gradually increasing the amount of stress you place on your body over time.
This added stress forces your body to adapt, and it does so by building muscle.
Eventually, you’ll reach a point where bodyweight exercises (unless you’re performing hundreds and thousands of reps) will no longer provide you with the stimulus necessary to build muscle.
And you’ll need weights if you want to continue making progress.
Related: Level up your strength training workouts with the double progression method!
Can bodyweight exercise help you lose weight?
The golden rule of fat loss is that you have to be in a calorie deficit for it to happen.
This is when you’re consuming fewer calories than you burn.
Several factors go into helping you create a deficit but at its very core, fat loss can be achieved by slightly decreasing how much food you eat and increasing your energy expenditure (how many calories you burn).
If you want to know exactly how many calories you should be eating to use weight, simply use my free calorie calculator.
Exercise-wise, there are two primary ways to create a deficit.
Number one is through daily movement.
Simply walking more is one of the most underrated fat loss tips there is.
You burn THREE TIMES the number of calories walking as you do your actual workouts.
The second piece is strength training.
Bodyweight exercises work well in a pinch or as part of a well-rounded strength training plan that includes weights too.
But they can’t be the ONLY form of exercise in your routine if you want to make progress long-term.
You’ll eventually need to add weights to your routine for maximum fat loss.

Best bodyweight exercises for beginners
Upper body exercises
1.) Push-ups
There isn’t a better no-equipment exercise to build muscle and strength in your upper body than good old push-ups.
There are many different variations you can do but for now, let’s talk about the tried and true traditional push-up from the ground.
You want to make sure you’re targeting the muscles you should (chest, triceps, and a little bit of shoulders) and the key to doing that is having proper form.
Here’s what that looks like:
- Start in the push-up plank position. Hands should be roughly shoulder-width apart and your wrists directly below your shoulders.
- Your spine should be in a neutral position (I.e. not rounding your back or sticking your butt up in the air).
- Brace your core as you prepare to lower yourself down. A cue to do this is to pretend someone is about to punch you in the gut. At the same time, imagine you’re trying to squeeze a penny between your butt cheeks.
- As you lower yourself down, make sure you’re not flaring your elbows out at 90 degrees. Keep them at around a 30-45 degree angle.
- Once you lower yourself down to the ground pretend like you’re trying to make a hole in the floor with your hands as you explode and press yourself up.
2.) Hand-release push-ups
When you reach the bottom of the push-up position, take your hands and raise them just above the ground.
Place them back on the ground, pause for a millisecond, then press up.
This takes the momentum out of doing push-ups so that you’re better able to isolate the muscles you want to work.
3.) Decline push-ups
These are harder than traditional push-ups since your feet are elevated.
It places your body at an angle, which makes you lift more of your bodyweight.
If you want to target your upper chest and front shoulders a little more, consider adding this push-up variation to your routine.
4.) Pause push-ups
Similar to hand-release push-ups, adding a pause at the bottom of the movement takes out any momentum so you can more effectively target the muscles you want.
This pause places more tension on your muscle fibers and the more tension you can apply the better.
5.) Half rep into full push-ups

This variation increases time under tension (TUT), similar to when doing pause push-ups.
And as we just talked about, more tension = better results.
You’re going all the way down, halfway back up, back down to the bottom, then all that way back up to the starting position.
^^^ That’s one rep.
6.) Spiderman push-ups

Bringing a leg to your elbow with each rep requires core stability and coordination.
It’s also more challenging for your upper body due to the unstable position.
7.) Dive bomber push-ups
Start in a pike position.
Slowly lower your upper body down like you’re trying to go under barbed wired on the ground.
Reverse the movement and return to the starting position.
Not only will this movement work your chest but it also calls significantly on your core muscles.
8.) Negative push-ups
Start in a push-up position.
Slowly lower yourself down to the ground, taking around 3-5 seconds to do so.
Once you reach the ground, release your hands and allow your chest to touch the ground.
Use your legs and arms to get back to the starting push-up position and repeat for desired number of reps.
9.) Incline push-ups
This is a less challenging variation of traditional push-ups.
Because of the angle of your body, you don’t have to lift as much of your bodyweight.
You can do these with a weight bench, chair, table, etc.
Keep your spine in a neutral position as you lower your body down.
Press up and return to the starting position.
10.) Wall push-ups

Due to the angle of your body, you’re pressing up the least amount of your bodyweight as far as push-ups go.
But your form doesn’t change.
Similar to traditional push-ups, keep your spine in a neutral position as you lower your body down.
Press up and return to the starting position.
11.) Supermans
This exercise primarily targets your lower back, upper back, glutes, and shoulders.
Lie face down with your arms extended out in front of you.
Lift your arms, chest, and legs off of the ground at the same time, pause for a second, then lower yourself back down to the ground.
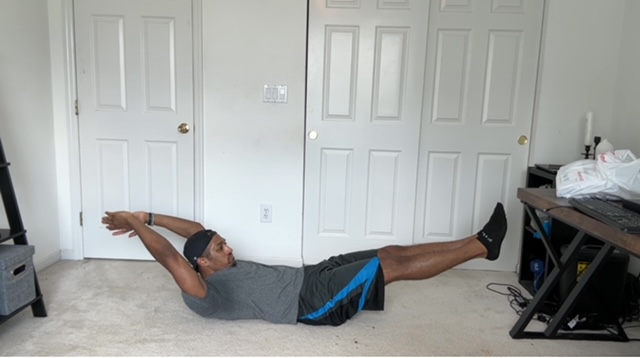
12.) Reverse snow angels
This exercise primarily targets your shoulders, lats, and core.
It’s like you’re doing a snow angel in the snow, just in reverse.
Lie face down on the floor, legs out behind you and arms out in front of you, palms facing downward.
Lift your legs up off of the floor and as you do so slowly bring your arms to your hips, twisting about halfway through so that your palms are facing upward.
Slowly return to the starting position with your legs and arms both on the ground.
Lower body exercises
13.) Squats
If you want a lower body exercise that’ll provide the most bang for your workout buck, squats are the one.
It’s the crème de la crème of lower body bodyweight exercises.
Similar to push-ups, there are other variations we’ll talk about but for now let’s just focus on the traditional squat.
To perform a squat, place your feet roughly shoulder-width apart or slightly outside that.
Your toes should be pointed outward slightly as well.
Now, how you squat will depend on the specific muscles you want to target:
- A slight lean forward at the torso will emphasize more glutes.
- Keeping your chest more upright hits more quads (By the way, it’s okay if your knees come over your toes).
- A wider stance will help target inner thighs.
Sometimes, squat depth can be an issue for people so don’t worry if it is for you.
If you’re struggling to get as deep as you’d like with your squats, try some of the following:
- Elevate your heels
- Have a wider stance while squatting and point your toes out a little more
- Work on your ankle and hip mobility
14.) Half rep into full squat
You’re placing your muscles under greater tension by adding a half rep.
And remember, the more tension the better.
15.) Pause squat
Same concept as above, the pause at the bottom of your squat increases TUT (time under tension), which gets you more out of the movement progress-wise.
16.) Squat jumps
Follow the same form as you would with a traditional squat.
Except at the bottom of the movement you are going to explode up off of the ground and jump up slightly into the air.
When coming down, don’t land on your heels!
Focus on landing as softly as you can on the balls of your feet.
17.) Forward lunges
Balance can be tricky for some when doing lunges so here’s a little trick to help you out with that.
Instead of stepping straight out, I want you to step out and a little out to the side.
This will give you a greater base of support.
A couple notes when it comes to lunges:
- Smaller lunge steps = more quad activation (knees will come over toes more).
- Larger lunge steps and a slight lean forward = more glute activation.
18.) Reverse lunges

The same concepts for forward lunges also apply to reverse lunges.
For balance, step backward and a little out to the side
The further you step back, the more you’ll target your glutes.
Having a slight forward lean will also place more of an emphasis on your glutes.
19.) Lateral lunges
Stand with your feet roughly shoulder-width apart.
Take a step out to the side with your right leg and bend your right knee as you sit down into a squat.
The majority of your weight will be on your right knee and you may have a slight forward lean in your torso (Just make sure not to round your back).
Push back up through your right heel to return to the starting position.
You can do all your reps on the same side before switching or you can alternate between your right and left legs.
20.) Split squat (static lunges)

Instead of taking a step forward as you would with traditional lunges, you’re going to start in a split squat position so all you have to do is drop down into the lunge.
Slowly lower yourself down until the thigh of the leg that’s forward is nearly horizontal to the ground.
Use both legs to drive yourself back up to the starting position (Your lead leg will do most of the work).
Perform all of your reps with one leg forward then switch to the other leg.
21.) Jumping lunges
Start in a split squat position.
Drop down into a lunge and explode up off of the ground, making sure to switch your lead leg in the air.
For example, if you start with your left leg as your lead leg, when you jump you’ll switch in the air so that your right leg comes forward.
Land softly on the balls of your feet and repeat for desired number of reps.
22.) Glute bridge
You’re not going for speed here.
Take things nice and slow and really focus on squeezing your glutes at the top of the movement.
Once you are at the top, you should be able to draw a straight line from your shoulders all the way up to your knees.
If you’re able to do that, it means you’ve avoided overextending your back (which is something you definitely don’t want).
23.) Single leg glute bridge
The same as a regular glute bridge, you’re just doing it on one leg.
24.) Calf raises
Place your feet flat on the floor, roughly shoulder-width apart.
Instead of turning your toes out slightly as you would with a squat, you want your toes pointing as straight ahead as possible.
Come up onto the balls of your feet and feel that contraction in your calves.
Pause for one Mississippi at the top, then lower yourself back down to the starting position.

Core exercises
25.) Plank

Get into a plank position with your forearms flat on the ground (Your arms should be making a 90-degree angle).
Brace your core and hold your body in a straight line.
Make sure you’re not sticking your butt up in the air or letting your hips sag.
26.) Side plank
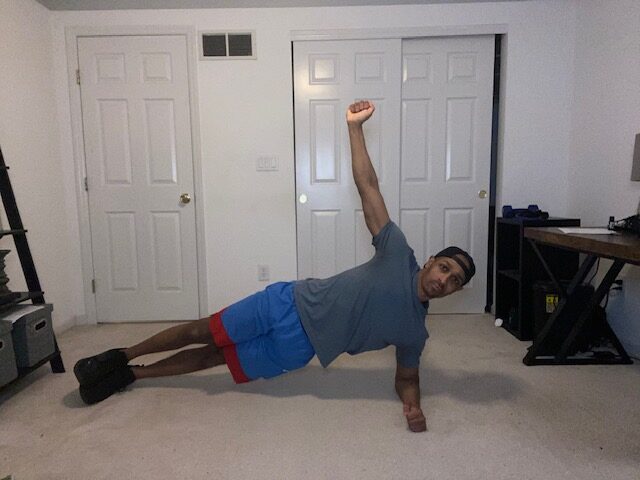
It’ll make things easier on your joints if you do this on a softer surface like a yoga mat.
Lay on your side.
Your feet should be stacked on top of each other and legs straight out in front of you.
Put your forearm on the ground (It should line up directly below your shoulder).
Brace your core as you hold this plank position, making sure not to let your hips sag.
27.) Hollow hold
Lay on the ground, face up.
Bring your legs up off the floor (around 2-3 inches) while doing the same thing with your arms.
Your arms should be outstretched as you brace your core and hold this position.
28.) Jack knife
Lie face up.
Extend your arms and legs so that your body forms a straight line.
While keeping your arms and legs extended, raise them up toward each other, bringing them together at the top of the movement.
Your head, torso, and shoulders should all be off the ground at this point.
Slowly return back to the starting position but don’t let your feet or hands touch the floor.
Repeat for the desired number of reps.
29.) Russian twist

A lot of exercises are done in the sagittal and frontal places.
However, Russian twist is done in the transverse plane (side to side), which is good because it allows you to work your body in a different way.
Raise your feet off the ground and cross them while getting into an upright position.
This movement involves rotating your torso from side to side.
30.) Reverse crunches
This is exactly how it sounds; you’re performing a crunch, just in reverse.
Lie face up with your arms at your sides.
Bring your legs up so that they form a 90-degree angle.
Your thighs should be in a vertical line and your shins should be in a horizontal line.
Brace your core as you curl your hips and knees up toward your chest (There should be flexion, or a slight bending, in your spine).
Then, slowly return to the starting position.
31.) Shoulder taps
Start in a push-up plank position.
Slowly lift one hand off of the ground and touch the opposite shoulder.
Repeat with the other hand and keep going for the desired number of reps.
Try to keep your body as straight as possible and limit any swinging or twisting.
What is the most effective bodyweight workout?
Here’s a sample workout for you you to try!
1A.) Push-ups: 3 sets x 10-15 reps (If you’re able to get 15 reps for all sets, perform 3 sets of push-ups for as many reps as possible).
Less challenging variations: Incline push-ups or wall push-ups
1B.) Pause squats: 2-3 sets x 10-12 reps
Less challenging variations: Traditional squats
2A.) Reverse snow angels 2-3 sets x 8-10 reps
Less challenging variation: Supermans
2B.) Jumping lunges (each leg): 2-3 sets x 8-10 reps
Less challenging variations: Reverse lunges or forward lunges
3.) Single leg glute bridge: 2-3 sets x 6-8 reps each leg
Less challenging variation: Glute bridge: 2-3 sets x 8-10 reps
4.) Hollow body hold: 2-3 sets x 30 sec-1 min. hold
Less challenging variation: Plank
Rest time between sets: 1.5-2 minutes.
*** If you see a number followed by a letter (I.e. 1A and 1B) this is what’s called a “superset.” A superset means performing a set of each exercise before taking a rest. For example, you’ll see 1A is push-ups followed by 1B, which is pause squats. You would perform a set of push-ups and then immediately go into your set of pause squats. You rest once you’ve done a set of each exercise. ***

What's up?
I’m Chad, I’m happy you’re here! I’m a certified personal trainer and my goal is to help you form practical, sustainable habits that lead to lifelong fitness results. If you want to lose fat, build muscle, and live a healthier, happier life then you’re right where you need to be. 💪🏾
Free resources
⬇⬇⬇


0 Comments